


Introduction: The Flexible Sub-DPS
In the current meta of Neverness to Everness, ![]() Daffodill occupies a unique architectural niche as the premier flexible sub-DPS and Break Specialist. Her strategic importance stems from her exclusive reliance on quick-swap mechanics — she is currently the only unit whose full combat potential is locked behind high-frequency swap-ins. Unlike sustained field-time damage dealers, Daffodill facilitates offensive flow by ignoring enemy defenses and delivering rapid Break application through follow-up attacks. Mastering her high skill ceiling is essential for optimising damage output in high-level endgame content.
Daffodill occupies a unique architectural niche as the premier flexible sub-DPS and Break Specialist. Her strategic importance stems from her exclusive reliance on quick-swap mechanics — she is currently the only unit whose full combat potential is locked behind high-frequency swap-ins. Unlike sustained field-time damage dealers, Daffodill facilitates offensive flow by ignoring enemy defenses and delivering rapid Break application through follow-up attacks. Mastering her high skill ceiling is essential for optimising damage output in high-level endgame content.
Core Identity
- Element: Chaos
- Primary Role: Sub-DPS / Break Specialist
- Combat Specialty: Quick-swap follow-up attacks and rapid Break application
- Niche: Defense-ignore scaling and unique movement tech
This guide is a technical manual for maximising Daffodill's utility, translating her complex skill data into a roadmap for peak performance.
Skill Mechanics and Advanced Execution
Daffodill's kit combines high-impact basic attack strings — including a held basic attack dash-through spin — with advanced movement capabilities currently unparalleled in the NTE roster.
The "Daff Glide" Movement Tech
Daffodill possesses the only movement tech in the game: the Daff Glide.
- Execute any Basic Attack.
- Perform a Dash Cancel immediately after the hit connects.
This technique provides significantly increased traversal speed and uses the dash's invincibility frames to maintain offensive pressure while bypassing enemy mechanics.
The Resonance System
Daffodill's Skill scales through teammate interaction.
- Stack Generation: Resonance stacks are generated whenever a teammate performs a support skill (Esper Cycle swap).
- Enhanced Activation: At two stacks, her next Skill becomes an enhanced version, clearly indicated at the bottom of the screen. This version maximises Chaos damage and Break impact.
Ultimate Mastery: Insight and Discord
Her Ultimate delivers a high-value nuke and applies the Insight effect, which scales all received Break damage on the target. This synergises with her support skill's Discord Enhancement. When targets are affected by both Nova and Scorch, the Discord status reduces the target's Break cap by 10% (stacking up to 30%), facilitating a Break loop by significantly lowering the threshold required to neutralise enemies.
Phantom Step and Parry Economy

After her Ultimate, Daffodill gains two stacks of Phantom Step (tracked above her HP bar when on-field, and on the right-side HUD when off-field).
- Follow-up Attacks: These powerful attacks trigger when she swaps back onto the field.
- Parry Economy: A successful parry using Phantom Step or her support skill instantly replenishes her Ultimate meter, bypassing standard energy-building requirements and enabling a continuous ultimate → Phantom Step loop.
Investment Strategy and Skill Prioritisation
Strategic resource allocation is vital for combat efficiency. Materials should be directed toward her passives first to unlock the raw multipliers needed for high-tier Break application.
Skill Levelling Priority
- Passives (1 & 2): Priority #1. Passive 2 increases Phantom Step damage by 80%, making it the primary damage scaler.
- Ultimate: Essential for maintaining the Insight effect and replenishing Phantom Step stacks.
- Skill: Optimised through the Resonance system for Chaos damage.
- Basic Attack: Useful for the held-spin mechanic but secondary to quick-swaps.
- Support Skill: Lower priority, though it facilitates the Discord status.
Resource Trap Warning: Avoid the Life Skill — it currently offers negligible combat return. In the early-to-mid game, cap all primary skills at Level 6 to maintain a balanced resource pool before committing to endgame material grinds.
Optimal Arc Configuration
Arcs provide the raw Attack and Break Intensity stats required to make Daffodill's kit effective in high-RES environments.
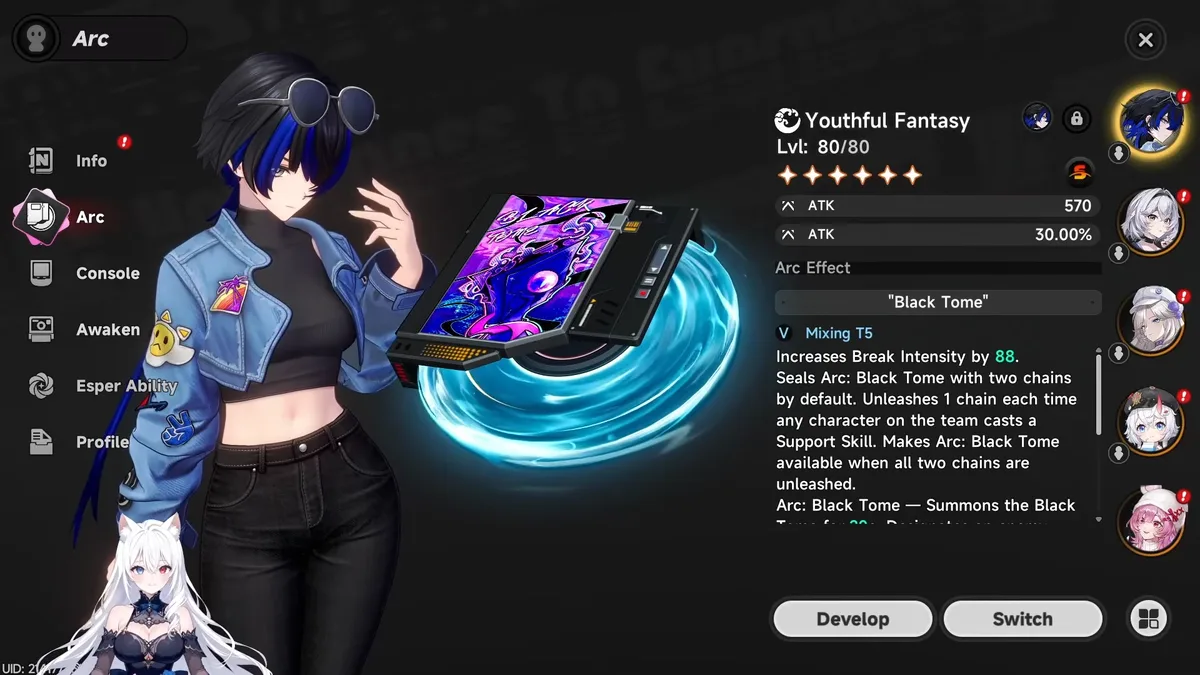
Best-in-Slot: Youthful Fantasy (S-Rank)
Obtained as a rare drop from the Black Tome boss, this Arc is the standard for high-investment builds.
- Acquisition: Duplicate Arcs for refinement are obtained using keys or through dedicated boss farming.
- Impact: Provides high ATK% and Break Intensity scaling. Its unique skill significantly boosts Chaos and Break damage, aligning perfectly with her role as a defensive shredder.
Budget Alternative: Shiny Days (A-Rank)
For players unable to farm the Black Tome, Shiny Days is the recommended substitute. Ensure the Main Stat is ATK% to compensate for the lower base scaling.
Console Architecture and Stat Thresholds
Optimising Daffodill requires the Diabolos set to maximise Chaos DMG and resistance shredding.
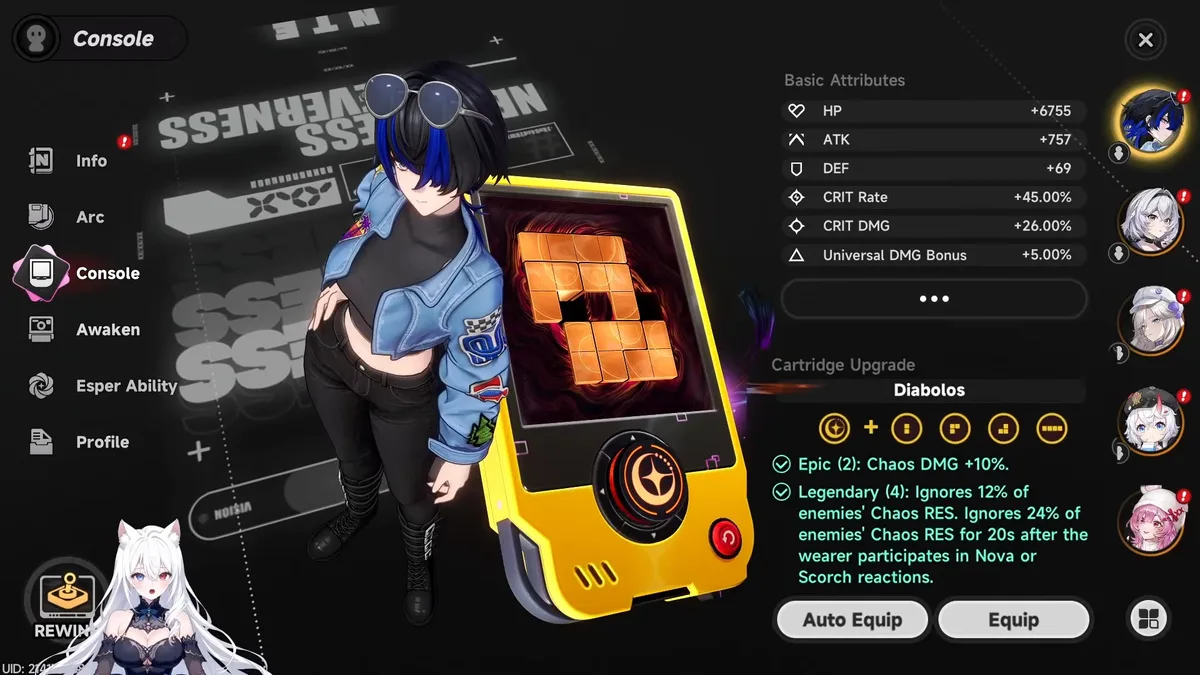
The Diabolos 4-Piece Synergy
The Diabolos set specialises in bypassing enemy Chaos resistance through elemental reactions.
| Bonus Type | Value | Condition |
|---|---|---|
| Chaos DMG Bonus | +10% | Passive (2-piece) |
| Chaos RES Ignore (Baseline) | 12% | Passive (4-piece) |
| Chaos RES Ignore (Reaction) | 24% | Active for 20s after Nova or Scorch reactions |
| Total RES Ignore | 36% | Combined during active reaction windows |
Substat Hierarchy
- Crit Rate (Primary Cartridge Stat)
- Crit DMG
- ATK%
- Universal DMG
- Break Intensity
Final Build Goals
Aim for these endgame thresholds: 50%+ Crit Rate, 90%+ Crit DMG, and 2,300+ ATK. While her Break damage compensates for lower ATK, these numbers are the baseline for high-level content.
Awakening Path and Resonance Priority
Awakenings (A1–A6) fundamentally reshape her rotation and energy economy, providing shortcuts to her endgame power caps.
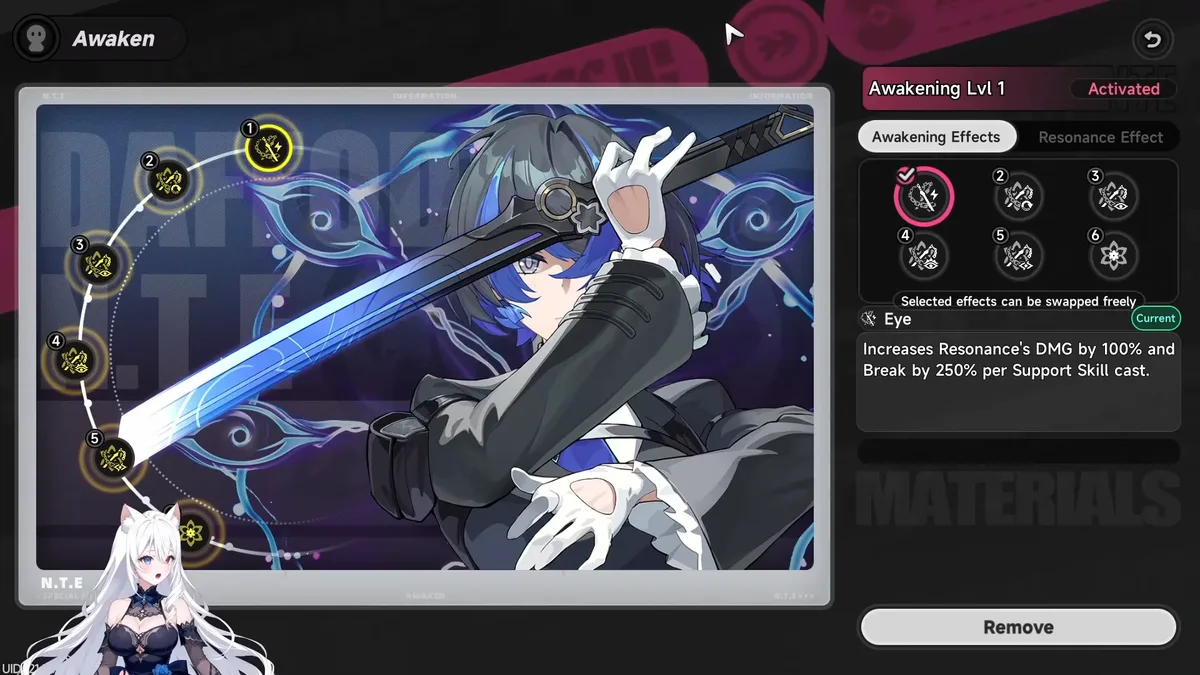
The A2 "Rotation Fail-Safe" Strategy
While A1 offers raw damage, A2 is the priority milestone. It allows her Ultimate meter to fully charge with her final attack even if a Phantom Step fails to parry. This removes the mechanical parry requirement, ensuring 100% uptime on Phantom Step stacks regardless of enemy attack patterns.
Break and Resonance Milestones
| Awakening | Effect |
|---|---|
| A1 | Resonance damage +100% and Break +250% per support cast |
| A2 | Ultimate meter fills on final attack even without a successful parry |
| A3 | Insight stacks up to 3 times; Break damage +15% per stack |
| A5 | Deals one additional instance of Break damage per Insight stack |
Priority Path: A2 → A1 → A3 → A4/5/6
High-Value Team Compositions and Rotations
Daffodill's flexibility allows her to skip standard Esper Cycle requirements in favour of pure quick-swap damage loops.
Team 1: The Sub-DPS Swap Loop (CC-Focused)
This composition focuses on crowd control and high-frequency swaps to maximise the Esper meter.


Rotation:
-
 Sakiri Skill/Ult: Group enemies and apply the ATK buff.
 - Daffodill Ult/Skill: Apply Insight and generate Resonance stacks.
-
 Zero Ult: Initiate the primary DPS window.
 - Daffodill Phantom Step: Swap in for the first follow-up attack.
- Zero Skill: Swap back to refill the Esper Cycle meter.
- Daffodill Phantom Step: Swap in for the second follow-up attack.
-
 Nanally Skill/Ult: Apply Blossom, gain the 30% Crit DMG buff, and finish.
Team 2: Baicang Main DPS Synergy
Daffodill's Insight effect exponentially scales ![]() Baicang 's detonation mechanics.
Baicang 's detonation mechanics.
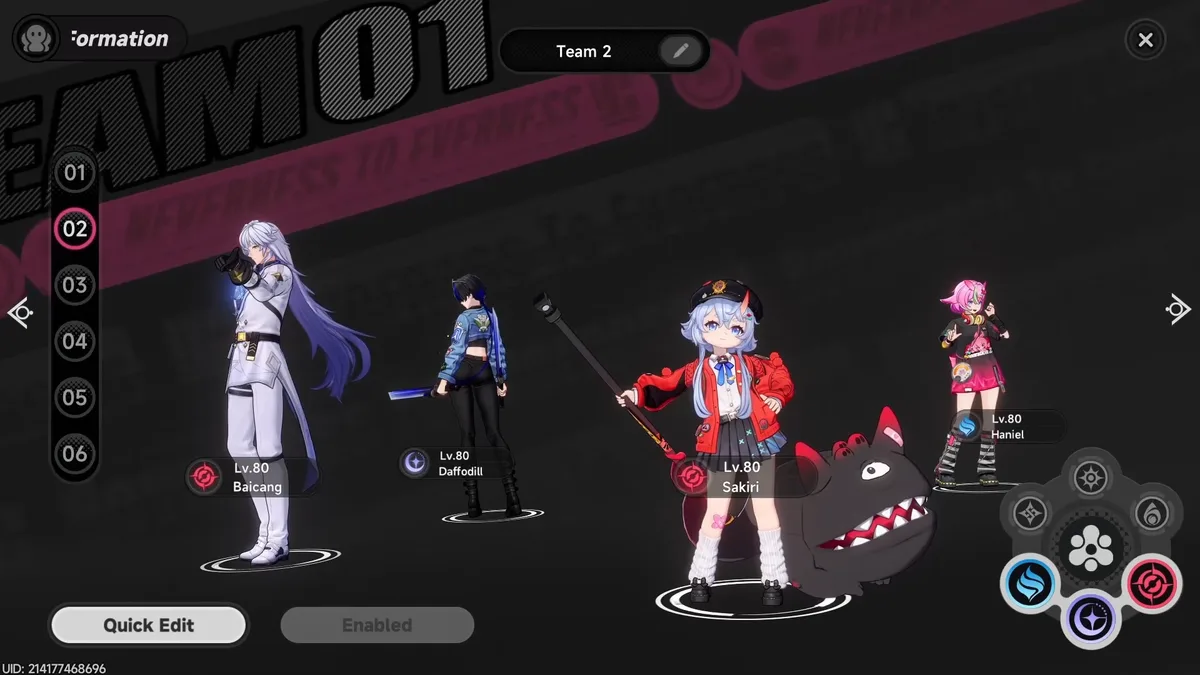

Rotation:
-
 Haniel Ult/Skill: Apply the initial ATK buff.
 - Sakiri Skill/Ult: CC and secondary ATK buffs.
- Daffodill Ult/Skill: Gain Phantom Step stacks (indicated at the bottom of the screen).
- Baicang Skill: Apply the Objurgate mark.
- Baicang Ult: Detonate Objurgate (scaled by Daffodill's Insight).
- Daffodill Quick Swaps: Trigger remaining Phantom Step stacks to clear high-health targets.
Multi-DPS Alternatives
For varied elemental synergies, Daffodill can be slotted with ![]() Jiuyuan ,
Jiuyuan , ![]() Hathor , or
Hathor , or ![]() Fadia . Her build remains static across these teams, confirming her status as the premier flexible sub-DPS in the current NTE version.
Fadia . Her build remains static across these teams, confirming her status as the premier flexible sub-DPS in the current NTE version.
Video Guide
Related Neverness to Everness Resources

Guide
Sakiri Support Guide
Master Sakiri's grouping mechanics, Ultimate buff economy, and team rotations in this comprehensive support guide.
Guide
Beginner's Progression Guide
Optimize your early account growth in NTE — from motorcycle traversal and City Tycoon economics to gear architecture and Esper Cycle mastery.
Guide
Earning Fons & Spending City Stamina
A complete guide to NTE's economic engine — how to level City Tycoon, exploit free Fon sources, and allocate City Stamina for maximum account efficiency.

News
NTE Team Responds to AI-Assisted Background Asset Feedback
The NTE team says AI-assisted tools were used only on a small number of background and environmental assets, with flagged assets being reworked.
News
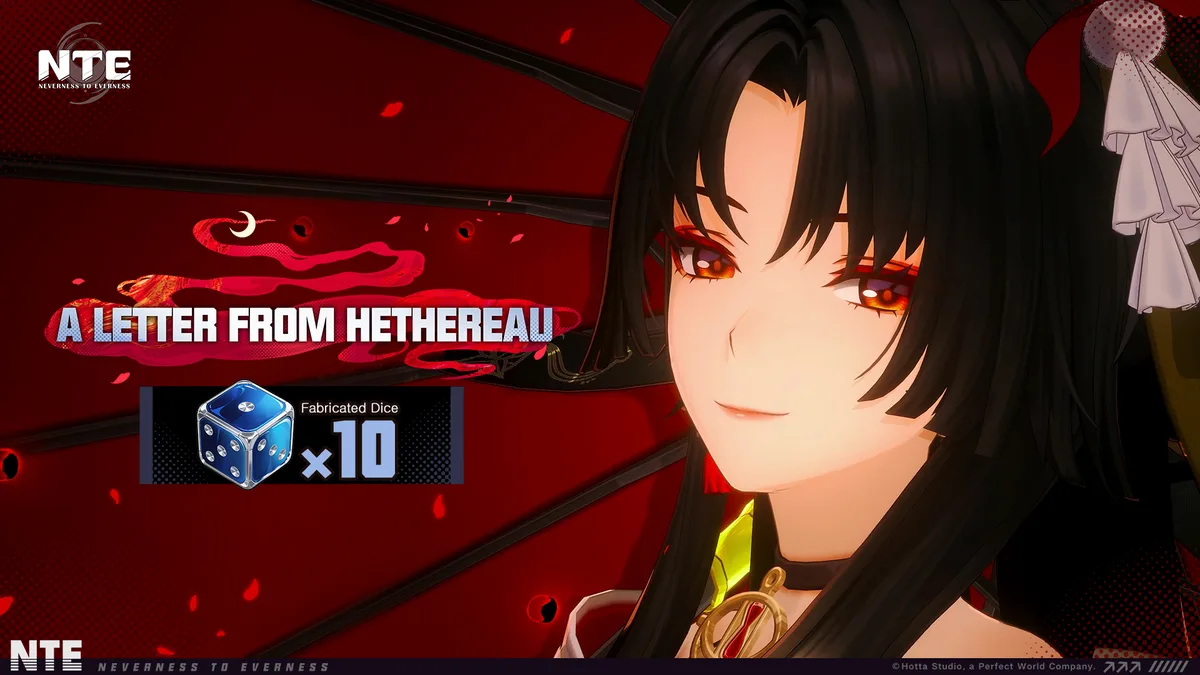
NTE Letter from Hethereau Reward: 10 Fabricated Dice After May 13 Maintenance
NTE players can receive 10 Fabricated Dice after the May 13 maintenance if they create a character and unlock Mail before Version 1.0 ends.