


Character Identity and Tactical Role
![]() Hathor is a cornerstone of the current Neverness to Everness meta, serving as the definitive Lakshana sub-DPS. Her strategic value is built entirely on her identity as a stack-based burst dealer, utilizing the "Express Delivery" mechanic to execute high-intensity combat windows. Hathor is not designed for sustained field time; rather, she is a frame-efficient specialist meant to enter the field, expend a condensed resource pool (Feather Stacks), and trigger a massive front-loaded burst before cycling out.
Hathor is a cornerstone of the current Neverness to Everness meta, serving as the definitive Lakshana sub-DPS. Her strategic value is built entirely on her identity as a stack-based burst dealer, utilizing the "Express Delivery" mechanic to execute high-intensity combat windows. Hathor is not designed for sustained field time; rather, she is a frame-efficient specialist meant to enter the field, expend a condensed resource pool (Feather Stacks), and trigger a massive front-loaded burst before cycling out.
| Category | Specification |
|---|---|
| Element | Lakshana |
| Primary Mechanic | Feather Stacks (Express Delivery Power) |
| Core Archetype | Burst Sub-DPS |
| Utility | Crowd Control (CC), Energy Recovery, and Crit Buffing |
The defining factor of her playstyle is her peerless rotational efficiency. Because her damage is so heavily front-loaded into her motorcycle-enhanced state, she allows your team to maximize the uptime of support buffs without the "DPS drift" often seen with field-hungry main carries. Mastering her swap-in triggers is the difference between a standard clear and a high-performance speedrun.
Kit Mechanics and Investment Priority
Hathor's efficacy relies on the synergy between her stack generation and her motorcycle-enhanced state. While her base kit provides utility, her Ultimate transforms her Skill into a heavy-hitting mobility tool that defines her damage floor.
Express Delivery Power (Feather Stacks)
Feather Stacks are the lifeblood of Hathor's kit. Optimization requires understanding that every Feather Stack gained also restores 5 Ultimate Energy, making stack generation synonymous with rotation speed.
- Normal Attack String: Standard generation via basic combat.
- Tornado (Hold Basic): Provides essential CC by grouping enemies while building stacks.
- Skill Charge: Grants 2 stacks on press. However, hit-tanking for stack acceleration is the pro-strat: holding the skill grants 3 additional stacks if Hathor is struck during the charge animation.
- Passive Generation: Defeating a target automatically grants 1 stack.

Investment Priority
In the early-to-mid-game resource crunch, cap all skills at Level 6 before committing to the final endgame grind.
- Passives: Non-negotiable utility and stat-checks.
- Skill: Your primary damage and stack engine.
- Ultimate: The multiplier for your burst window.
- Basic/Support: Low priority; secondary to her burst-swap identity.
The "Remora Enhancement" passive is her premier utility. Extending Remora to 12 seconds and adding a flat 10% crit rate buff against affected targets allows Hathor to act as a force multiplier for the entire team.
Arc Optimization: The Raging Flames Standard
Arc selection for Hathor is not a matter of preference — it is a requirement. The "Raging Flames" Arc is her undisputed Best in Slot (BiS). There is no excuse for not running this weapon, as it is farmable via the Headless Rider boss.
Because you can farm this Arc, the performance floor for Hathor is exceptionally high. A max-refined 4-star Raging Flames will consistently outclass unrefined 5-star alternatives due to the raw stat scaling and ease of acquisition.

Pro-Tip: Aggressively use your keys on the Headless Rider. Securing refinements for Raging Flames is the single most efficient way to boost your damage output early on.
Console Architecture and Stat Thresholds
Hathor's Console must utilize the "Street Boxer" set. This configuration rewards the team for triggering Remora or Stain reactions with a 10% Lakshana damage bonus and a massive 28% total crit rate increase (14% base + 14% on reaction).
Stat Priority Hierarchy: Crit Rate > Crit Damage > Attack % > Universal Damage > Flat Attack
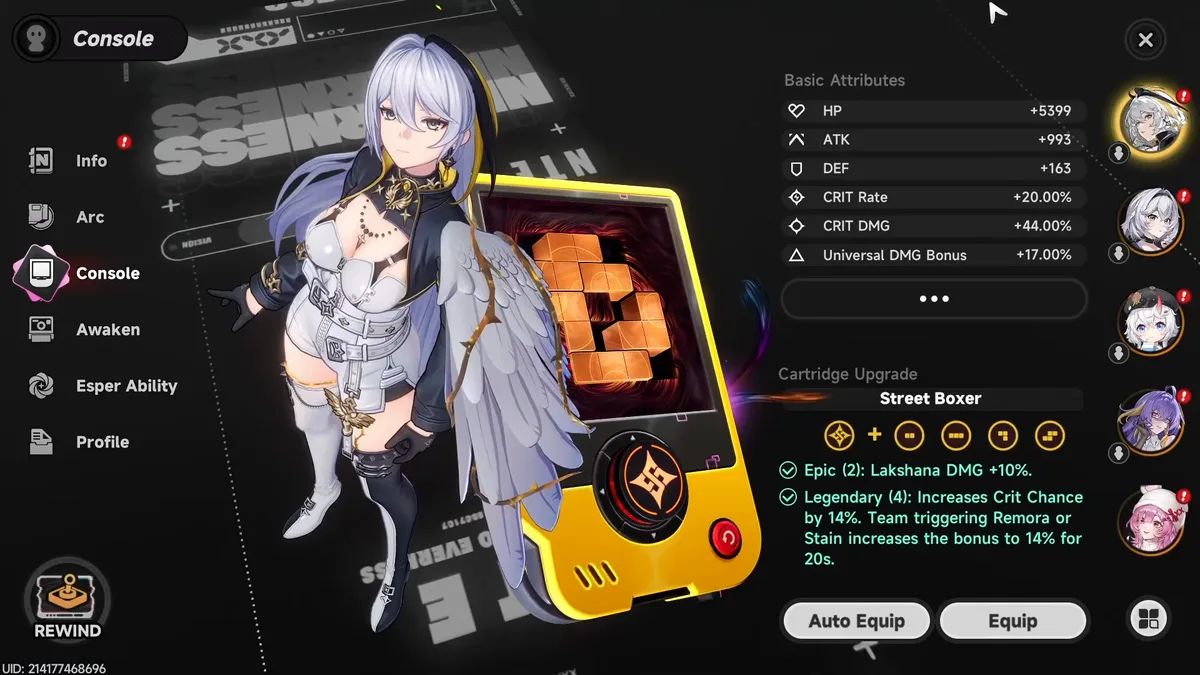
Endgame Stat Goals:
| Stat | Target |
|---|---|
| Base Crit Rate | 35% (65% fully buffed) |
| Crit Damage | 110%+ |
| Total Attack | 2,300+ |
The Early Game Pivot: While the Lakshana Damage Bonus cartridge is the goal, do not hesitate to swap to a Crit Rate cartridge if you cannot hit the 35% base threshold. A sub-DPS that doesn't crit is a liability.
Awakening Progression and Dupe Value
Hathor's Awakenings are remarkably front-loaded, offering significant comfort upgrades for low-investment players while scaling exponentially for higher investment.
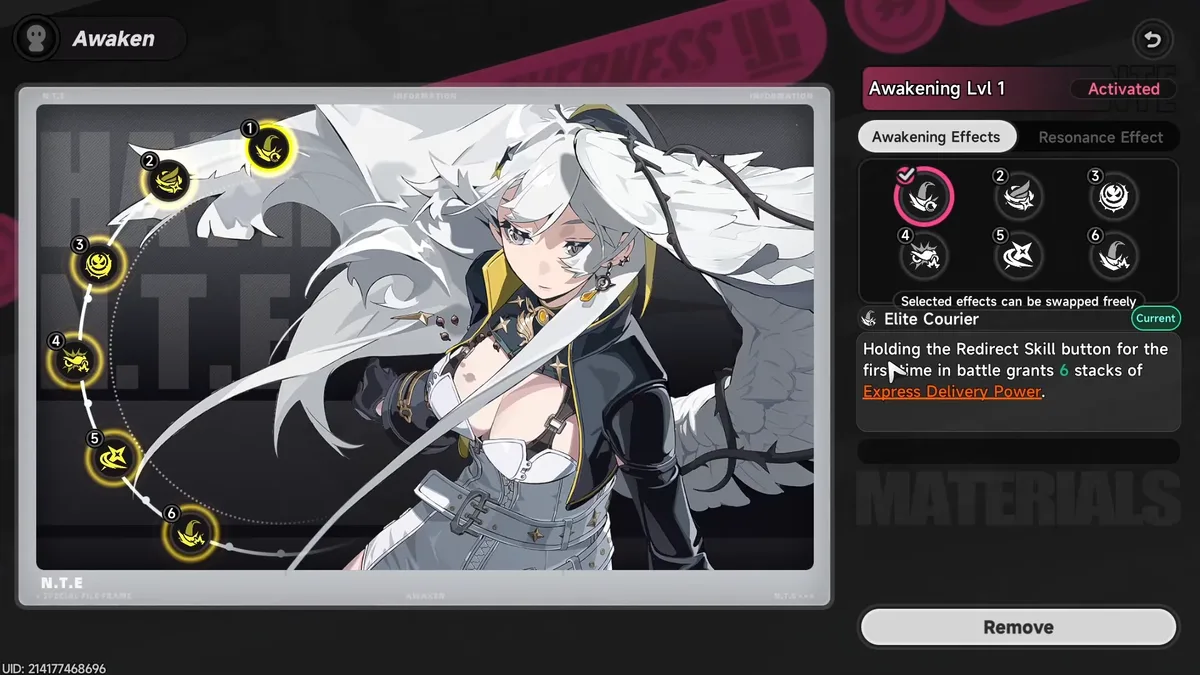
- Awakening 1 (A1): The premier efficiency spike. Granting 6 instant stacks the first time you hold her skill in battle completely removes the opening clunkiness of her rotation.
- Awakening 2 (A2): This unlocks the "Emergency Delivery" state. When specific kit buffs — "Excellent Rating Lock" and "Five-Star Tracking" — expire, she enters a heightened state. This grants a 30% Crit Damage bonus and a stacking damage buff (up to 15%). Critically, it grants a 25% Crit Chance bonus to Cyclone Strike (the motorcycle attacks used during her Ultimate), essentially guaranteeing crits during your burst window.
Elite Team Compositions and Burst Rotations
To trigger the Street Boxer Console buffs, your team must consistently apply Remora and Stain.
The Premier Meta Team


-
 Zero : Remora Provider & Esper Cycle Engine.
 -
 Fadia : Stain Provider & Tank. Fadia is essential because she absorbs the damage Hathor wants to take while hit-tanking the skill charge.

Maximum Damage Rotation:
-
 Sakiri : Hold Skill → Ultimate (Grouping CC and ATK buff).
 - Zero : Ultimate → Skill (Instant Remora setup).
- Hathor: Swap in → Hold Skill. Hit-tank an enemy attack to gain maximum stacks and restore the Esper cycle meter.
- Hathor: Ultimate → Skill Spam. Expend all stacks via Cyclone Strike.
- Zero: Because Hathor's skill charge restores the Esper cycle meter, you can "double-dip" by swapping immediately back to Zero to refresh Remora and cycle the engine again.
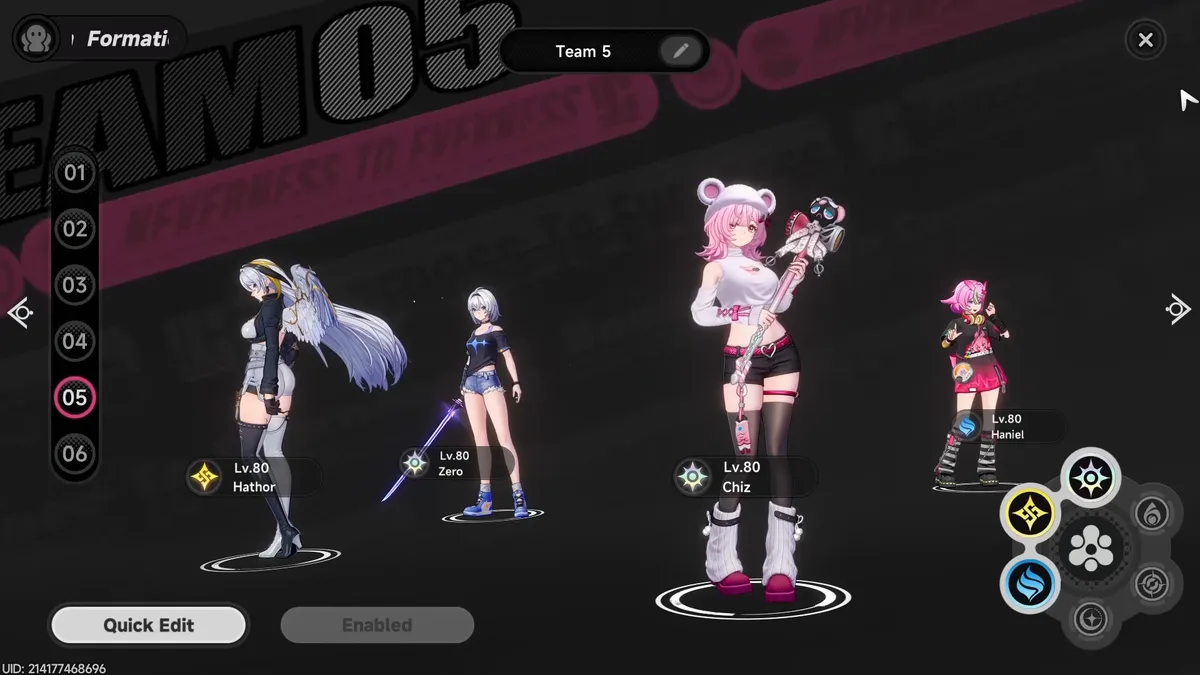
F2P Alternative Team
In this comp, ![]() Chiz acts as the field-filler to bridge the gap during Hathor/Zero cooldowns. Start with the Hathor/Zero engine to utilize Zero's instant Esper cycle meter for general PvE efficiency.
Chiz acts as the field-filler to bridge the gap during Hathor/Zero cooldowns. Start with the Hathor/Zero engine to utilize Zero's instant Esper cycle meter for general PvE efficiency.
Tactical Note: The "Motorcycle Overshoot"
Hathor's motorcycle can overshoot targets, scattering enemies and ruining your CC grouping.
Workaround: If you risk losing enemy positioning, trigger your Ultimate as soon as stacks are full rather than maximizing the charge. It's a minor damage loss, but a massive gain in total team clear speed by keeping enemies tightly grouped for follow-up attacks.
Conclusion
Hathor remains a top-tier sub-DPS for the NTE endgame. Mastering her stack-to-energy conversion and leveraging ![]() Fadia 's protection for accelerated charging is the hallmark of a high-performance strategist.
Fadia 's protection for accelerated charging is the hallmark of a high-performance strategist.
Video Guide
Related Neverness to Everness Resources
Guide
Beginner's Progression Guide
Optimize your early account growth in NTE — from motorcycle traversal and City Tycoon economics to gear architecture and Esper Cycle mastery.
Guide
Earning Fons & Spending City Stamina
A complete guide to NTE's economic engine — how to level City Tycoon, exploit free Fon sources, and allocate City Stamina for maximum account efficiency.
Guide
S-Rank Selector Strategic Blueprint
A comprehensive strategy guide on optimizing account progression by utilizing the S-Rank selector box efficiently.

News
NTE Best of Hethereau Photo Contest: Rewards, Deadline, and How to Enter
NTE's Best of Hethereau Photo Contest runs until May 7, with 40 winners receiving Annulith, Fons, and Beetle Coins.
News
NTE May 1 Hotfix: Schedule and Full Fix List
NTE's May 1 hotfix runs from 10:00 to 14:00 UTC+8, with fixes for quests, crashes, UI, PS5 camera jitter, and more.