


Executive Introduction: The Current DPS Apex
In the current Patch 1.0 environment of Neverness to Everness (NTE), ![]() Nanally has emerged as the definitive DPS benchmark. As the debut limited banner unit, her Anima-element kit provides the strategic blueprint for the current end-game meta. Nanally functions as a "follow-up specialist," leveraging a high-frequency offensive loop that maintains a superior Utility-to-Damage (UTD) ratio compared to standard burst dealers. Her unique gravity-defying mechanics allow for frame-perfect positioning and verticality, effectively ignoring traditional battlefield constraints to maintain uptime during complex boss phases. Mastering Nanally is not merely about gear — it is about understanding the technical internal synergies of her "Ichi-daime's Authority" state and the precise execution of her follow-up triggers.
Nanally has emerged as the definitive DPS benchmark. As the debut limited banner unit, her Anima-element kit provides the strategic blueprint for the current end-game meta. Nanally functions as a "follow-up specialist," leveraging a high-frequency offensive loop that maintains a superior Utility-to-Damage (UTD) ratio compared to standard burst dealers. Her unique gravity-defying mechanics allow for frame-perfect positioning and verticality, effectively ignoring traditional battlefield constraints to maintain uptime during complex boss phases. Mastering Nanally is not merely about gear — it is about understanding the technical internal synergies of her "Ichi-daime's Authority" state and the precise execution of her follow-up triggers.
Internal Synergy & Scaling Logic
Nanally's combat efficacy relies on the seamless integration of her active attacks and the "Ichi-daime's Authority" state. To maximize optimization windows, players must monitor the skill button at the bottom of the screen, which provides a real-time visual indicator of this state's remaining duration.
Technical Ability Breakdown
- Basic Attack: A standard strike string. Holding the input executes "Street Fighter" maneuvers, essential for maintaining ground-level pressure.
- Plunge Attack: A vertical AoE strike used to reset positioning from gravity-defying states.
- Gun Special: Fired from her Vita Pistils; serves as a prerequisite for triggering reaction passives.
- Skill: Delivers five instances of damage and triggers Ichi-daime's Authority. This 12-second state grants a 30% Crit DMG bonus, enables wall-running, and permits Nanally to ignore gravity for superior battlefield traversal.
- Ultimate: Summons the Underboss, dealing seven initial instances of damage. For 6 seconds, the Underboss performs follow-up attacks that mirror Nanally's offensive rhythm.

Passives & Blossom Reactions
The core of Nanally's "sweaty" optimization lies in her passives. Blossom Enhancement fires 10 Vita Pistils, reducing the interval between shots to a 1-second cadence. Her second passive, Fair Duel, triggers a follow-up attack during an Esper Cycle reaction while in the Ichi-daime's state. This damage is classified as Vita Pistil damage from the Blossom Reaction.
Skill Investment Hierarchy (UTD Optimized)
- Passives: The engine of her follow-up mechanics. Maximum priority for floor-to-ceiling damage scaling.
- Basic Attack: High UTD during the Underboss window, where basic attack strings are the primary damage vehicle.
- Ultimate: Essential for summons damage and burst window efficiency.
- Life Skill: Zero impact on combat-effective UTD; skip entirely for resource optimization.
Arc Archetypes: Statistical Thresholds & Diminishing Returns
Arc selection is a balancing act between Raw DMG multipliers and Crit Rate consistency. Without a high Crit Rate, Nanally's follow-up kit fails to trigger, causing a total collapse of her UTD.
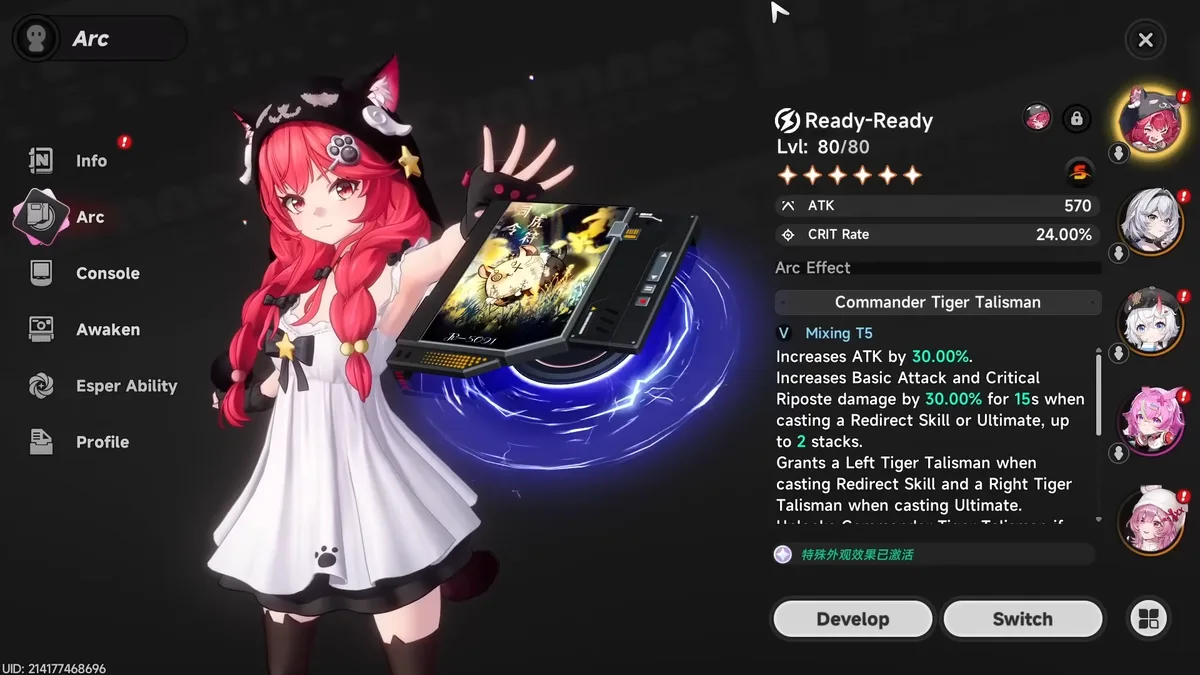
S-Rank Arc Comparison
| Arc Name | Main Stat / Buff | Strategic Synergy | Recommendation |
|---|---|---|---|
| Ready-Ready | Crit Rate | Massive ATK/Basic ATK buffs; optimizes the post-Ult loop | Best-in-Slot (BiS) |
| Fluff of Fortitude | Raw DMG | 22% flat DMG multiplier; superior to ATK% due to scaling with enemy HP | High (Ceiling Option) |
| Song of the Whale | Attack % | Simple ATK buff; suffers from diminishing returns in high-investment builds | Moderate |
| Raging Flames | Lakshana DMG | Zero synergy with Anima-element kits | Not Recommended |
The F2P Specialist: OraOra!
For F2P players, OraOra! is the premier choice. It increases Basic Attack damage per hit. Since Nanally's optimal gameplay loop involves summoning the Underboss and then exhausting her Basic Attack string to trigger follow-ups, this Arc's stacking mechanism mirrors her rotation perfectly.
Console Architecture: Anima Synergy & Module Geometry
The Console build is the primary driver of Nanally's end-game ceiling. To compete at the highest level, the Fireflies and the Forest set is mandatory.
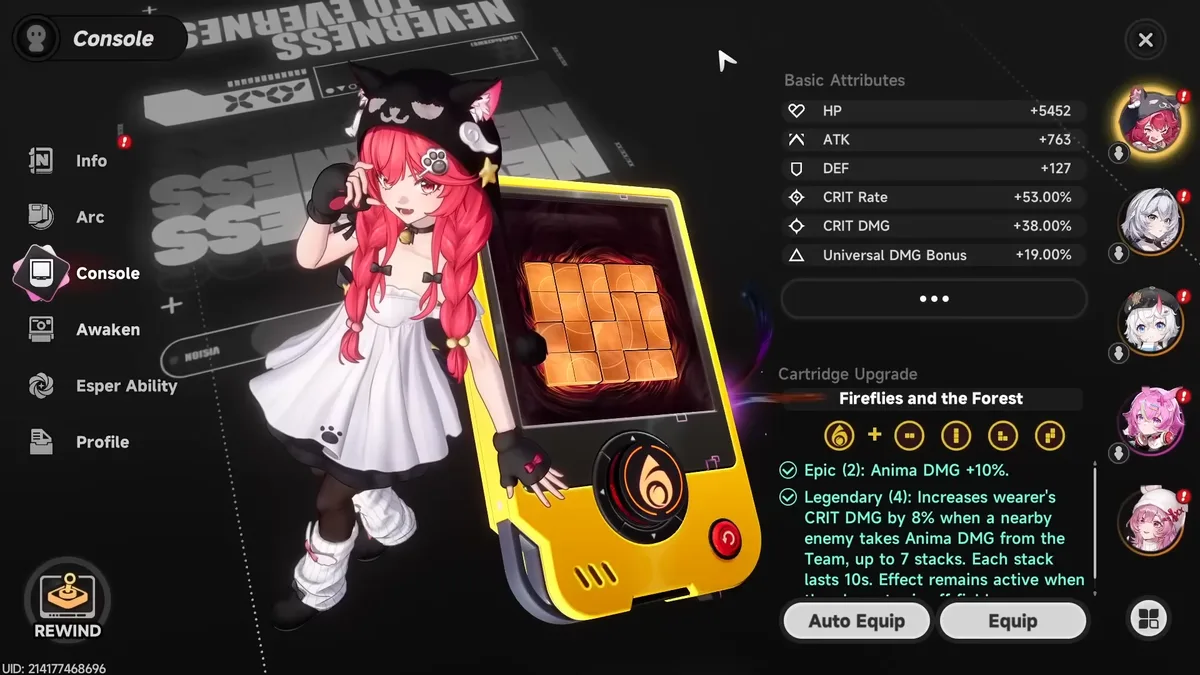
Set Logic & Cartridge Specs
- 2-Piece: +10% Anima DMG bonus
- 4-Piece: Stacking Crit DMG buff (8% per hit, up to 7 stacks) for a massive 56% total Crit DMG increase
- Cartridge Main Stat: Anima Damage Bonus
- Optimization Note: If you lack the Ready-Ready Arc (Crit Rate main stat), substitute Anima Damage for a Crit Rate main stat on the Cartridge to reach the minimum trigger threshold
Substat Priority: Crit Rate > Crit DMG > ATK% > Universal DMG > Flat ATK
The Type-2 Module Strategic Lock
Nanally's unique Console passive provides a 6% Crit Rate increase for every Type-2 module equipped. The physical grid layout must prioritize the Fireflies and the Forest set bonus first, then maximize the remaining grid space with Type-2 modules.
Final Build Goals (Optimization Ceiling)
| Stat | Target |
|---|---|
| Crit Rate | 75% (minimum for consistency) |
| Crit DMG | 95% unbuffed / 150% fully stacked |
| Total ATK | 2,300 – 2,400 |
Awakening Progression: Quantifying the Energy Engine
Awakenings shift Nanally from a standard DPS to a self-sustaining engine.
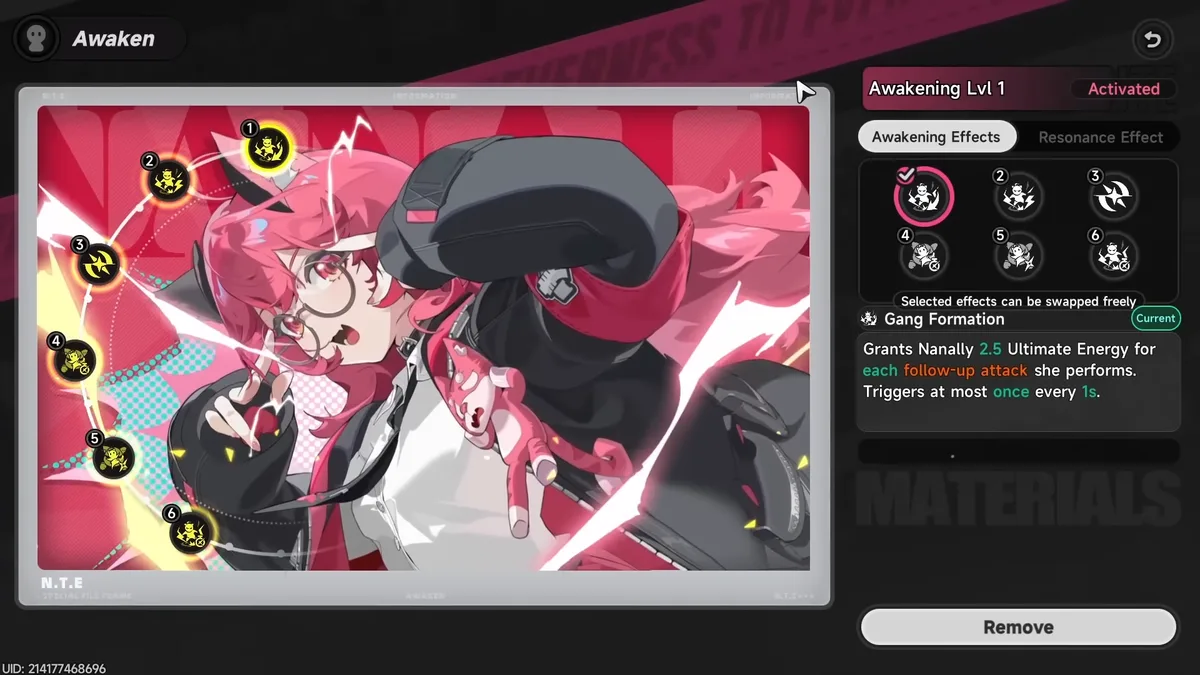
| Awakening | Effect | Impact |
|---|---|---|
| A1 | +2.5 Ultimate energy per follow-up (triggers every 1s) | 15 energy floor during 6s Underboss window — nearly refunds the Ultimate per rotation |
| A2 | +3s Underboss duration; 50% ATK follow-up while in Ichi-daime's state | Extends burst window significantly |
| A4 | +100% Underboss DMG | Largest raw damage spike |
| A5 | Stacking ATK buff (2% per follow-up, 20% cap) | Sustained scaling over long fights |
| A6 | Extends Ichi-daime's duration to 15s (20s out of combat) | Ensures permanent uptime on wall-running and buffs |
Team Compositions & Tactical Rotations
The "Esper Cycle" mechanic rewards immediate meter generation. ![]() Zero is Nanally's most indispensable partner due to their instant cycle meter skill.
Zero is Nanally's most indispensable partner due to their instant cycle meter skill.
Archetype 1: The Meta Dominator


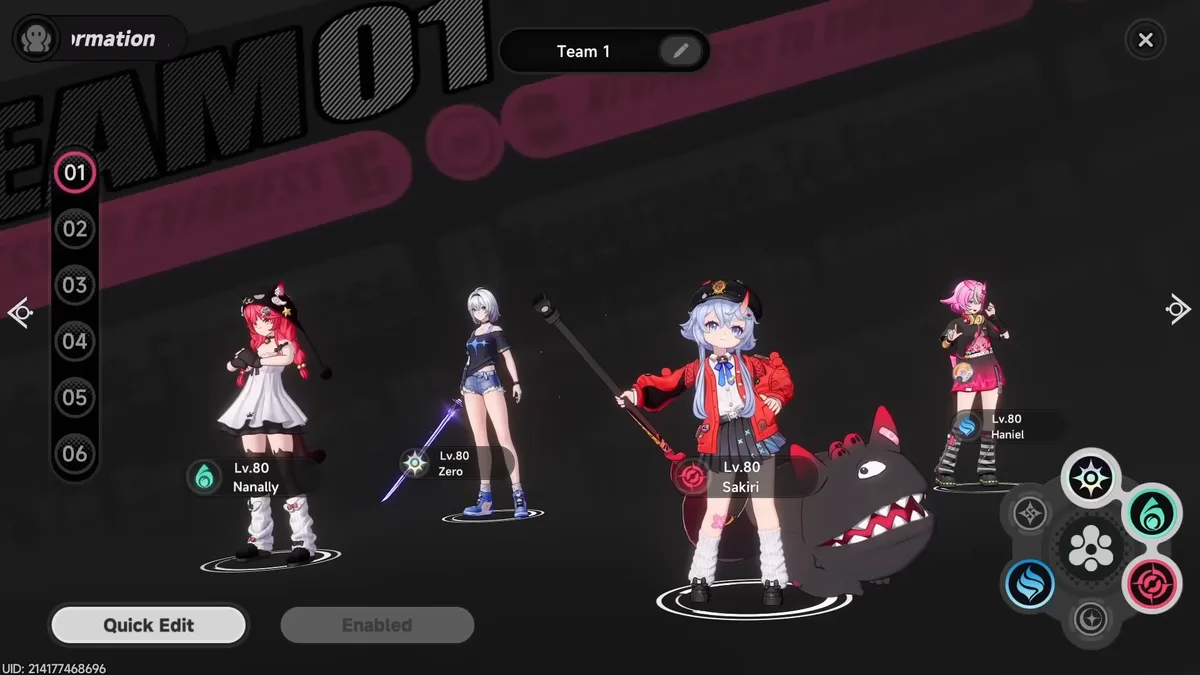
The highest damage ceiling in Patch 1.0. ![]() Sakiri provides CC and
Sakiri provides CC and ![]() Haniel delivers high-impact ATK buffs.
Haniel delivers high-impact ATK buffs.
Scenario 1 — Maximum Damage Rotation (Standard Burst):
Haniel
[Q]→[E]→ Sakiri[Hold E]→[Q]→ Zero[Q]→[E]→ Esper Cycle Swap: Nanally → Nanally[Q]→[E]→ Basic Spam
Scenario 2 — Hex Optimization (High-Ceiling Variation):
Use this when Sakiri has a full Esper Cycle meter to apply Hex for 20% extra damage.
Haniel
[Q]→[E]→ Sakiri[Hold E]→ Esper Cycle Swap: Nanally (Apply Hex) → Quick Swap: Sakiri[Q]→ Zero[Q]→[E]→ Esper Cycle Swap: Nanally → Nanally[Q]→[E]→ Basic Spam
Archetype 2: The Boss Crusher

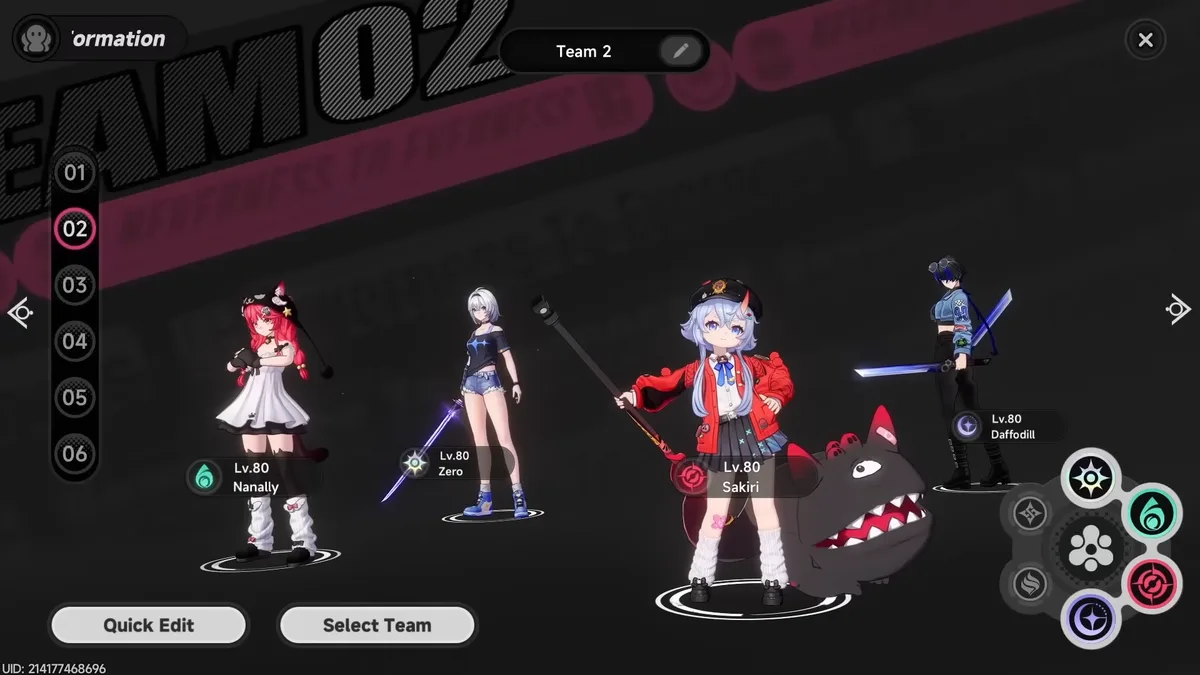
Focused on "Break" efficiency. ![]() Daffodill is cycled in to shred boss stagger bars before Nanally enters her burst window.
Daffodill is cycled in to shred boss stagger bars before Nanally enters her burst window.
Strategic Summary
To dominate the Hethereau district, master the timing of the Blossom Reaction and the specific window of the Underboss summons. Maintain the discipline of the Hex rotation to push past end-game DPS checks, and pace your progression to avoid burnout in the Anima-element meta.
Key checkpoints before tackling endgame content:
- 75% Crit Rate minimum achieved (before buffs)
- Fireflies and the Forest 4-piece active
- A1 unlocked for energy self-sustain
- Zero on the team for instant Esper Cycle access
Video Guide
Related Neverness to Everness Resources
Guide
Baicang Strategic Guide
Master Baicang's Power Word system, optimal rotations, and team compositions in this comprehensive guide for the ETD-4 Captain.
Guide
Reroll Guide
How to reroll efficiently in NTE using the salting method, how many pulls you can expect per run, and who to target.

Guide
Esper Cycles & Reactions
A complete guide to NTE's Esper system — how to fill the Esper Meter, trigger elemental reactions, chain Trio effects, and unlock resonance bonuses for every character.

News
NTE May 1 Hotfix: Schedule and Full Fix List
NTE's May 1 hotfix runs from 10:00 to 14:00 UTC+8, with fixes for quests, crashes, UI, PS5 camera jitter, and more.

News
NTE Launch Drift Discord Quest: How to Get 700 Discord Orbs
NTE's Launch Drift Discord Quest asks PC players to play for 15 minutes with Discord open to earn 700 Discord Orbs.