


Character Overview: The Chaos Main DPS Paradigm
In the Version 1.1 meta of Neverness to Everness,
![]() Lacrimosa
has established herself as the definitive Chaos-element Main DPS, fundamentally shifting the benchmark for high-end bossing. Her kit is built around a dual-form stance system and the Nightmare Damage over Time debuff, which maintains a high damage floor while offering a massive ceiling for effective HP shredding. Where traditional burst units suffer from rigid rotations, Lacrimosa adapts to any encounter through superior positional advantage and unique utility.
Lacrimosa
has established herself as the definitive Chaos-element Main DPS, fundamentally shifting the benchmark for high-end bossing. Her kit is built around a dual-form stance system and the Nightmare Damage over Time debuff, which maintains a high damage floor while offering a massive ceiling for effective HP shredding. Where traditional burst units suffer from rigid rotations, Lacrimosa adapts to any encounter through superior positional advantage and unique utility.
| Attribute | Detail |
|---|---|
| Element | Chaos |
| Role | Main DPS |
| Signature DoT | Nightmare (stacking, 10 cap) |
| Key Reaction | Discord (Chaos + Psyche + Incantation) |
| Secondary Reaction | Scorch (Incantation + Chaos) |
Core Identity Traits:
- Dual-Stance Versatility: Seamlessly toggles between Melee and Ranged stances to maintain damage uptime regardless of enemy positioning or arena hazards.
- Skill Replication (Copy): Accesses a library of recorded Anomaly abilities, using enemy-scaled stats against them.
- Nightmare & Discord Engine: A signature stack-based DoT that facilitates the game’s most potent Esper reaction, Discord, for explosive single-target damage.
Lacrimosa’s complexity requires a solid understanding of internal cooldowns and stance-specific animation cancels, but that investment pays off in the highest Discord proc consistency available in the current meta.
Mechanical Deep-Dive: Esper Abilities and Copy Mechanics
Optimizing Lacrimosa requires mastering her dual-stance fluidity. This is not merely a visual shift — it dictates your engagement range and safety windows at every moment of the fight.
Tactical Mobility Tip: Holding the dodge button triggers Lacrimosa’s Bat Form, a vital mobility tool that lets her fly over ground-based boss AoEs and reposition without losing momentum.
Basic Attack: Sweet and Sour
The G key toggles her combat stance, and your choice each moment determines the entire flow of a rotation:
| Feature | Melee Sequence | Ranged Sequence |
|---|---|---|
| Goal | Close-quarters aggression and high-impact finishers | Positional safety and consistent kiting |
| Primary Mechanic | Full string completion triggers a high-damage projectile explosion | High-velocity rapid-fire projectiles |
| Transition | Press G to switch to Ranged Stance |
Press G to switch to Melee Stance |
Skill: Morning Tomato & Copy Logic
To unlock the Copy effect, complete her Spin-off quest in the character journal.
- The Pokedex System: Copying is not limited to the current target. Once recorded, skills are managed via a “Pokedex” icon in the abilities menu, letting you curate a library of Anomaly powers. These skills scale from the original owner’s attack stats and can be animation-canceled via dodging.
- Passive 2 — Uptime Reset: Lacrimosa gains an additional Morning Tomato attempt after using Tomato Medal or Tomato Percussion five times during the skill’s cooldown. This reset is essential for maximizing Nightmare stack application.
Ultimate: Working Day Judgment
Working Day Judgment is a massive AoE that serves as her primary stack generator — activating it instantly applies five stacks of Nightmare, setting up the full Scorch and Discord reaction cycle.

The Nightmare Debuff and Discord Enhancement
- Stack Logic: Nightmare caps at 10 stacks with a base 3-second duration.
- Discord Proc: When Discord fires on a Nightmare-afflicted target, it triggers additional damage equal to 400% of Lacrimosa’s Attack.
- The Math: At a standard endgame benchmark of 2,300 Attack, a single Discord proc delivers 9,200 raw damage before resistance shredding or crit multipliers are applied.
Skill Leveling Priority
- Passives — fundamental for reset mechanics and stack efficiency
- Skill — primary source of utility and replicated damage
- Ultimate — main AoE and Nightmare application
- Basic Attack — field uptime filler
- Support Skill — lowest priority
Stop leveling at Level 6 for mid-game progression. The resource investment curve spikes exponentially beyond this point, and diverting those materials to a secondary team for Beyond the Rails provides a higher account-wide return.
Arc Architecture: Weaponizing Chaos
Your Arc choice determines how effectively you bridge raw stats and break utility.
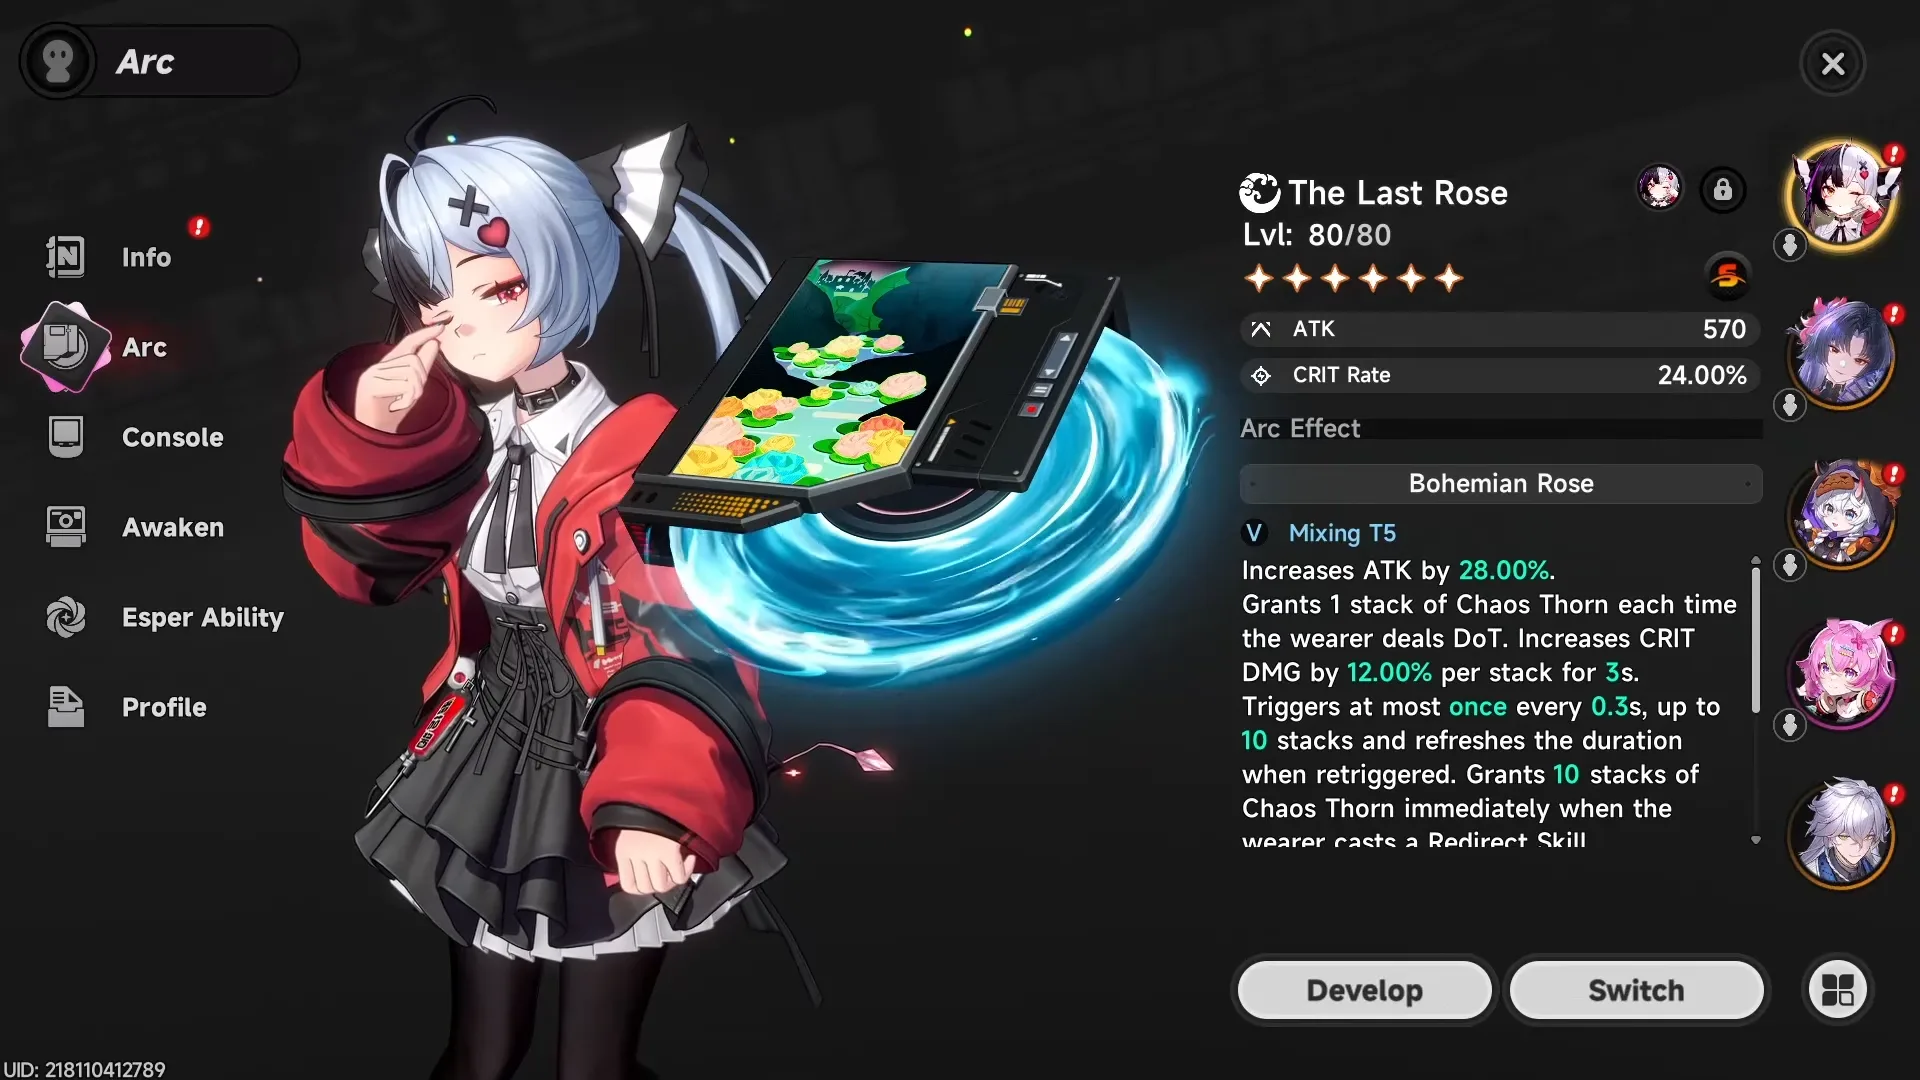
- The Last Rose (Best-in-Slot): The non-negotiable choice for competitive play. Beyond its Crit Rate main stat and aggressive Attack scaling, it extends the enemy’s Broken state, providing a larger tactical window for the team to capitalize on vulnerability phases.
- Youthful Fantasy (F2P/Alternative): Focuses on break intensity and grants a flat Chaos damage bonus. The optimal choice for players prioritizing boss-breaking over crit-fishing.
- Fluff of Fleetness: A high-ceiling option requiring Lacrimosa to remain on-field for at least five seconds to fully stack its damage bonuses.
- Shiny Days (Best A-Rank): The only viable A-rank recommendation. Other lower-tier Arcs fail to scale with her Chaos DoT needs, whereas Shiny Days provides the most stable damage floor.
Console and Module Optimization: The Diabolos Build
The Diabolos set is the gold standard for Lacrimosa. Its ability to ignore 12% Chaos Resistance — doubled to 24% for 20 seconds after a Nova or Scorch reaction — is vital for bypassing the high resistance floors of 1.1 bosses.

Stat Goals Checklist:
| Stat | Target |
|---|---|
| Main Stat (Cartridge) | Chaos Damage Bonus |
| ATK | 2,300+ |
| Crit Rate | 60% |
| Crit DMG | 100% |
Substat Priority (descending):
- Crit Rate — stabilizes Discord procs
- Crit Damage
- ATK%
- Damage Bonus
- Flat ATK
Awakening Evaluation: From Core Unit to Endgame Carry
Lacrimosa’s Awakenings shift her from a standard carry into a self-sufficient powerhouse. The progression is highly linear, with each tier meaningfully expanding her capabilities.
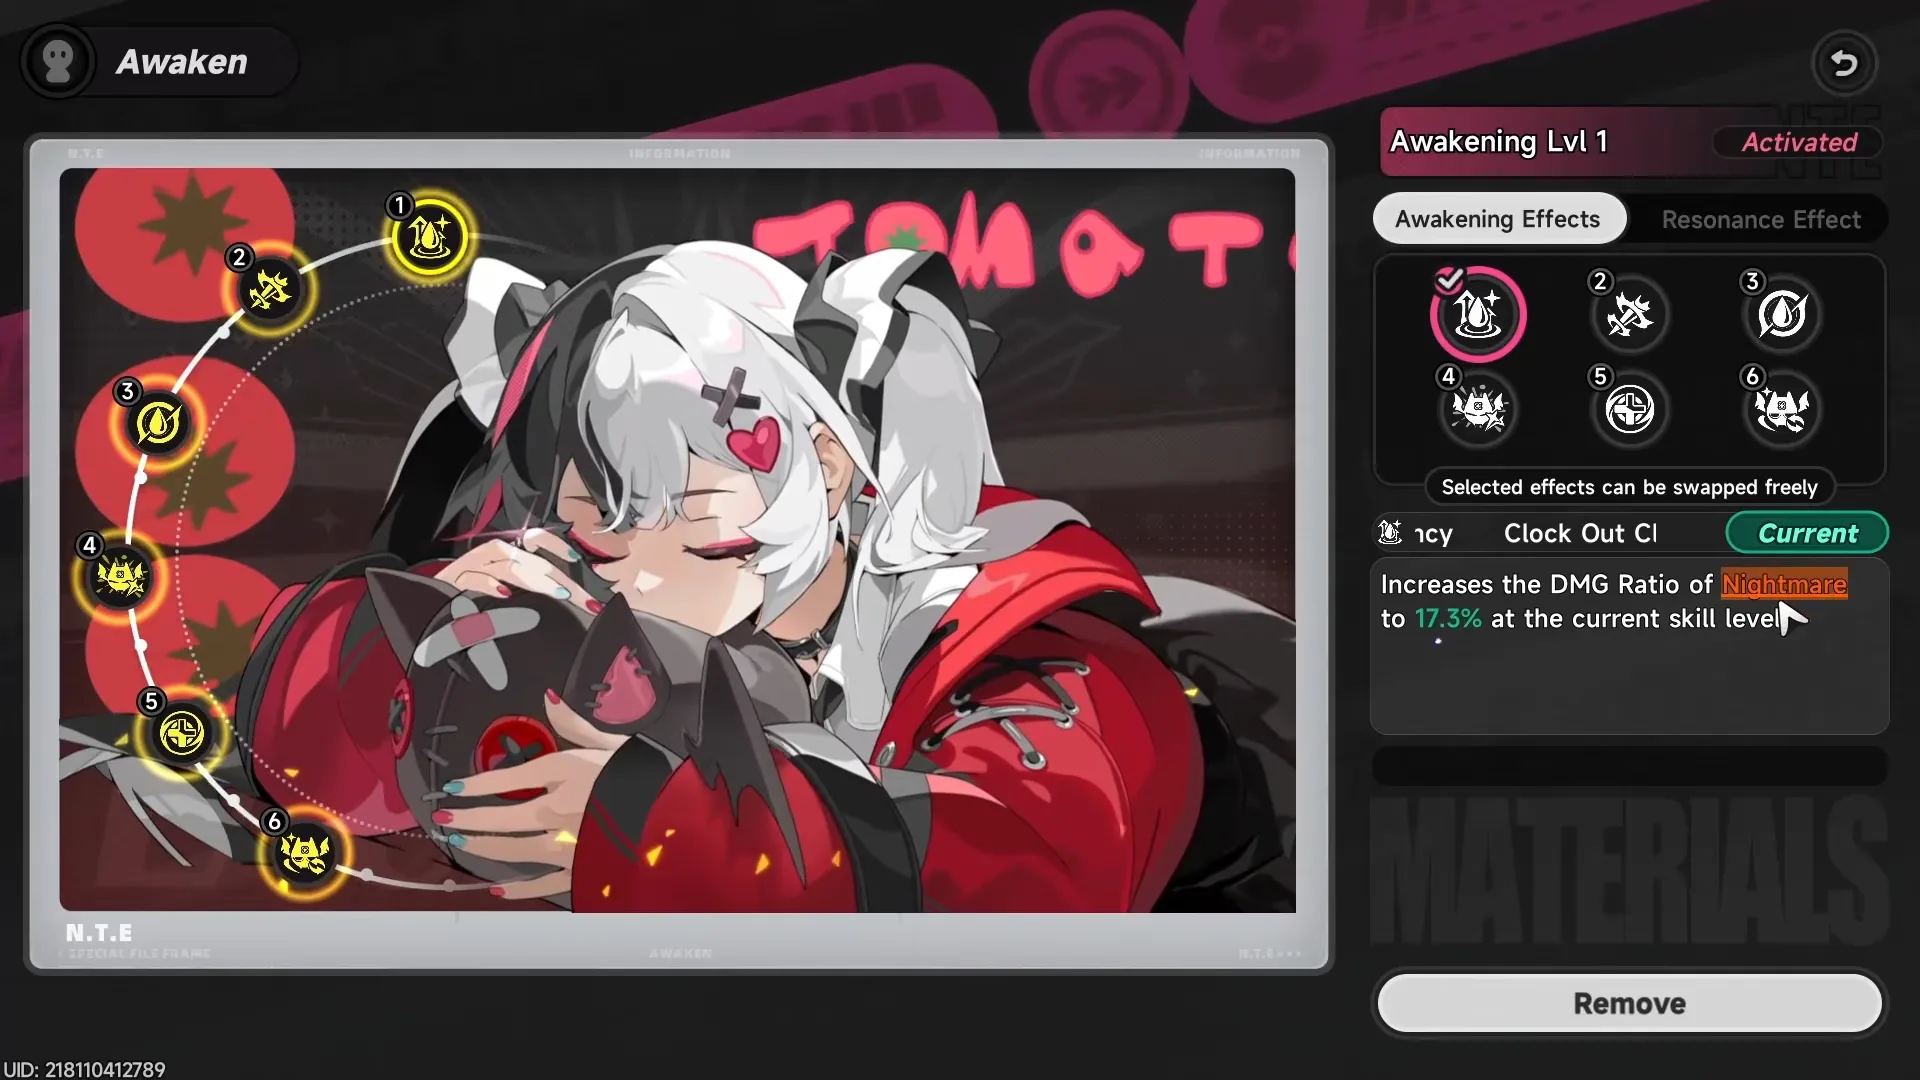
| Awakening | Effect |
|---|---|
| A1 & A4 | Enhance Nightmare damage ratios and double the DoT duration to 6 seconds |
| A2 | Provides a 15% damage boost immediately on support-skill entry |
| A3 | Triggers all Nightmare effects instantly on the 5th basic attack hit — premier choice for front-loaded burst and speedrunning |
| A5 (Tempest Glass) | Reduces the target’s max HP by 200% of a single Nightmare instance; includes built-in self-healing for solo-sustain in high-difficulty content |
| A6 | Auto-casts her support skill during Nova, Scorch, or Discord triggers, creating a near-perfect reaction loop |
A5 is the standout investment threshold. Its HP-shredding effect and self-heal together make Lacrimosa viable in content that would otherwise require a dedicated healer slot.
Tactical Synergies: Team Compositions and Rotations
The Discord Spam meta is currently the most efficient approach for clearing 1.1 content. Pairing Chaos with Incantation and Psyche units is mandatory for maximizing Break gauge pressure and Discord proc frequency.
The Discord Bossing Team


-
 Hotori
— Mandatory for her ability to replay all team skills, doubling the Discord proc window.
Hotori
— Mandatory for her ability to replay all team skills, doubling the Discord proc window. -
 Sakiri
— Delivers the Scorch reaction and grouping utility.
Sakiri
— Delivers the Scorch reaction and grouping utility. -
 Haniel
— The F2P-friendly buffer who facilitates Nova cycles. Swap in
Haniel
— The F2P-friendly buffer who facilitates Nova cycles. Swap in
 Daffodill
when focusing on ultra-fast breaking.
Daffodill
when focusing on ultra-fast breaking.
F2P Alternative Team
![]() Aurelia
,
Aurelia
,
![]() Adler
, and
Adler
, and
![]() Haniel
form a reliable reaction-based alternative for players without Hotori or Sakiri.
Haniel
form a reliable reaction-based alternative for players without Hotori or Sakiri.
The Discord Rotation
- Initiate: Start with Hotori’s skill to prepare the replay.
- Prime: Switch to Sakiri, using her Ultimate and held skill for the initial Esper Cycle.
- Scorch: Switch to Lacrimosa to trigger the Scorch reaction.
- Nova/Discord: Cycle to Haniel for the Nova trigger, which cascades automatically into a Discord proc.
- Replay: Swap back to Hotori and use her Ultimate to refresh all team cooldowns.
- Burst: Deploy Lacrimosa’s Ultimate and Copy Skill, then execute basic attack strings to hold 10 Nightmare stacks until the rotation repeats.
Utility and Life Skills
Lacrimosa’s value extends beyond combat. Her Pink Paws skill is a priority investment — Pink Paws Credits are a notorious bottleneck for long-term progression, and utilizing Lacrimosa for farming ensures you are never throttled by currency in the late game.
Her banner also offers high-tier cosmetic value, including the Tomato Duo glider and exclusive vehicle skins. While optional, these items signal her status as the definitive 1.1 powerhouse.
Video Guide
Related Neverness to Everness Resources
Guide
Shinku: Rotation & Team Composition Guide
A practical F2P guide to Shinku's kit, best A0 team, gear, and rotation in Neverness to Everness.
Guide
999 Nights: Mystery Button Farming Guide
Farm Mystery Buttons efficiently in NTE's 999 Nights Nightmare mode with this Eclipseflame team setup, Mythic accessory priorities, and semi-AFK plus manual farming routes.
Guide
Iroi: Deleting Bosses in 999 Nights Nightmare Mode
Build Iroi into a boss-melting machine for NTE's 999 Nights Nightmare mode by stacking White Lightflame with Zero, Mint, and Shinku support.
News
NTE July 16, 2026 Hotfix Patch Notes
NTE deploys a hotfix on July 16, 2026 at 14:00 UTC+8. The patch fixes Shinku bugs, 999 Nights issues, auction house behavior, and more.
News
NTE Shadow-n-Seek Event Guide: Dates, Roles, and Rewards
NTE's Shadow-n-Seek asymmetric PvP event runs July 17 to August 19, 2026. Learn the Hider and Hunter rules, win conditions, and Shadebound Shop rewards.