


































Two Kinds of Buff
There is far more happening under a Suikoden STAR LEAP battle than the element wheel, and most of it lives in the buff system. Once you have the matchup right, this is where the remaining performance is.
Buffs and debuffs come in two families that behave completely differently.
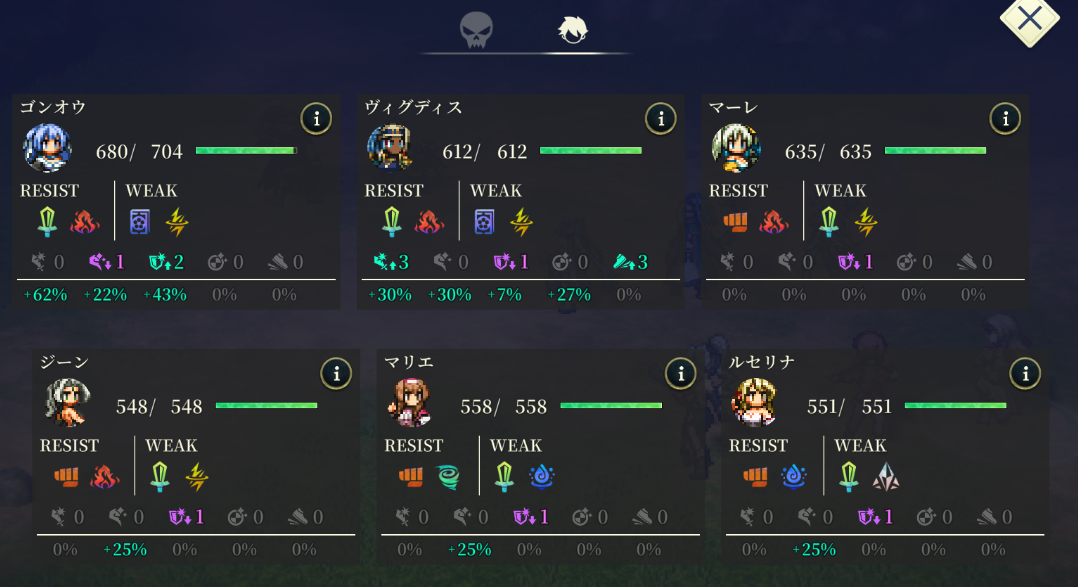
Stacking stages are the ones shown as a number — 1, 2, 3 and so on. They cap at 5, they are temporary, and they usually fall off two or three turns after the affected character or enemy next acts. Timing them is the whole skill: a defence debuff is worth the most immediately after you break something, and an attack buff wants to land right before your damage window opens. The skills that apply them have limited uses per battle and a chance to land, so a plan that needs three of them in a row will sometimes fail.
Stacking a stage that is already applied adds to the count without extending the duration. Dispelling works the opposite way and strips every stage at once, so a single dispel can undo four turns of setup.
Percentage buffs have no duration at all. They are strong for exactly that reason, and the only ways to remove one are to apply a percentage buff or debuff on top of it, or to rely on a condition written into the buff itself — the ones that grant 100% of a stat and then bleed 4% per turn, for example.
Speed Stages, Measured
Speed is the stat where the stage numbers have been pinned down, and it is worth reading the actual multipliers before you spend a skill slot on them.
| Stage | Multiplier |
|---|---|
| −5 | 0.82 |
| −4 | 0.84 |
| −3 | 0.86 |
| −2 | 0.90 |
| −1 | 0.94 |
| 0 | 1.00 |
| +1 | 1.07 |
| +2 | 1.15 |
| +3 | 1.22 |
| +4 | 1.28 |
| +5 | 1.35 |
Two things fall out of that table.
The scale is asymmetric. Five stages of speed buff give you roughly 35% more speed, while five stages of debuff take only about 18% away from the enemy. Buffing your own team is simply worth about twice as much as debuffing theirs, and if a support offers both, the buff is the one to use.
The negative side flattens out fast. Going from 0 to −1 costs the target 6%, and the step from −4 to −5 costs 2%. Once an enemy is two or three stages down, further speed debuffs buy you almost nothing and those skill uses are better spent elsewhere. The positive side stays close to even across all five stages, so stacking a speed buff to the cap remains worthwhile.
Other stats very likely follow a similar curve, though their exact numbers are still being pinned down.
Positioning and Row Passives
Placing melee characters in front and healers behind is a habit worth breaking. Read the passives first, especially on supports, because a large share of them care about the row and not just the team.
The patterns you will see:
- Buff the ally in front — the character buffs whoever stands directly in front of them, which means one specific ally rather than the whole row. Put your support directly behind the attacker you want carried and the damage difference is substantial.
- Buff the ally behind — the mirror image, and it wants the opposite arrangement.
- Buff the ally in front or behind — a handful of characters,
 Peter
among them, carry this wider version, and it appears to stack with the two above.
Peter
among them, carry this wider version, and it appears to stack with the two above. - Apply a buff to the character in front or their row — these fire at the start of the battle, which is what makes them valuable in fights where the enemy would otherwise act first and delete someone.
- Apply a debuff to the enemies in front — also a start-of-battle trigger, and an attack debuff or a defence buff landing before the first enemy turn is often what carries you through the opening exchange.
A worked example
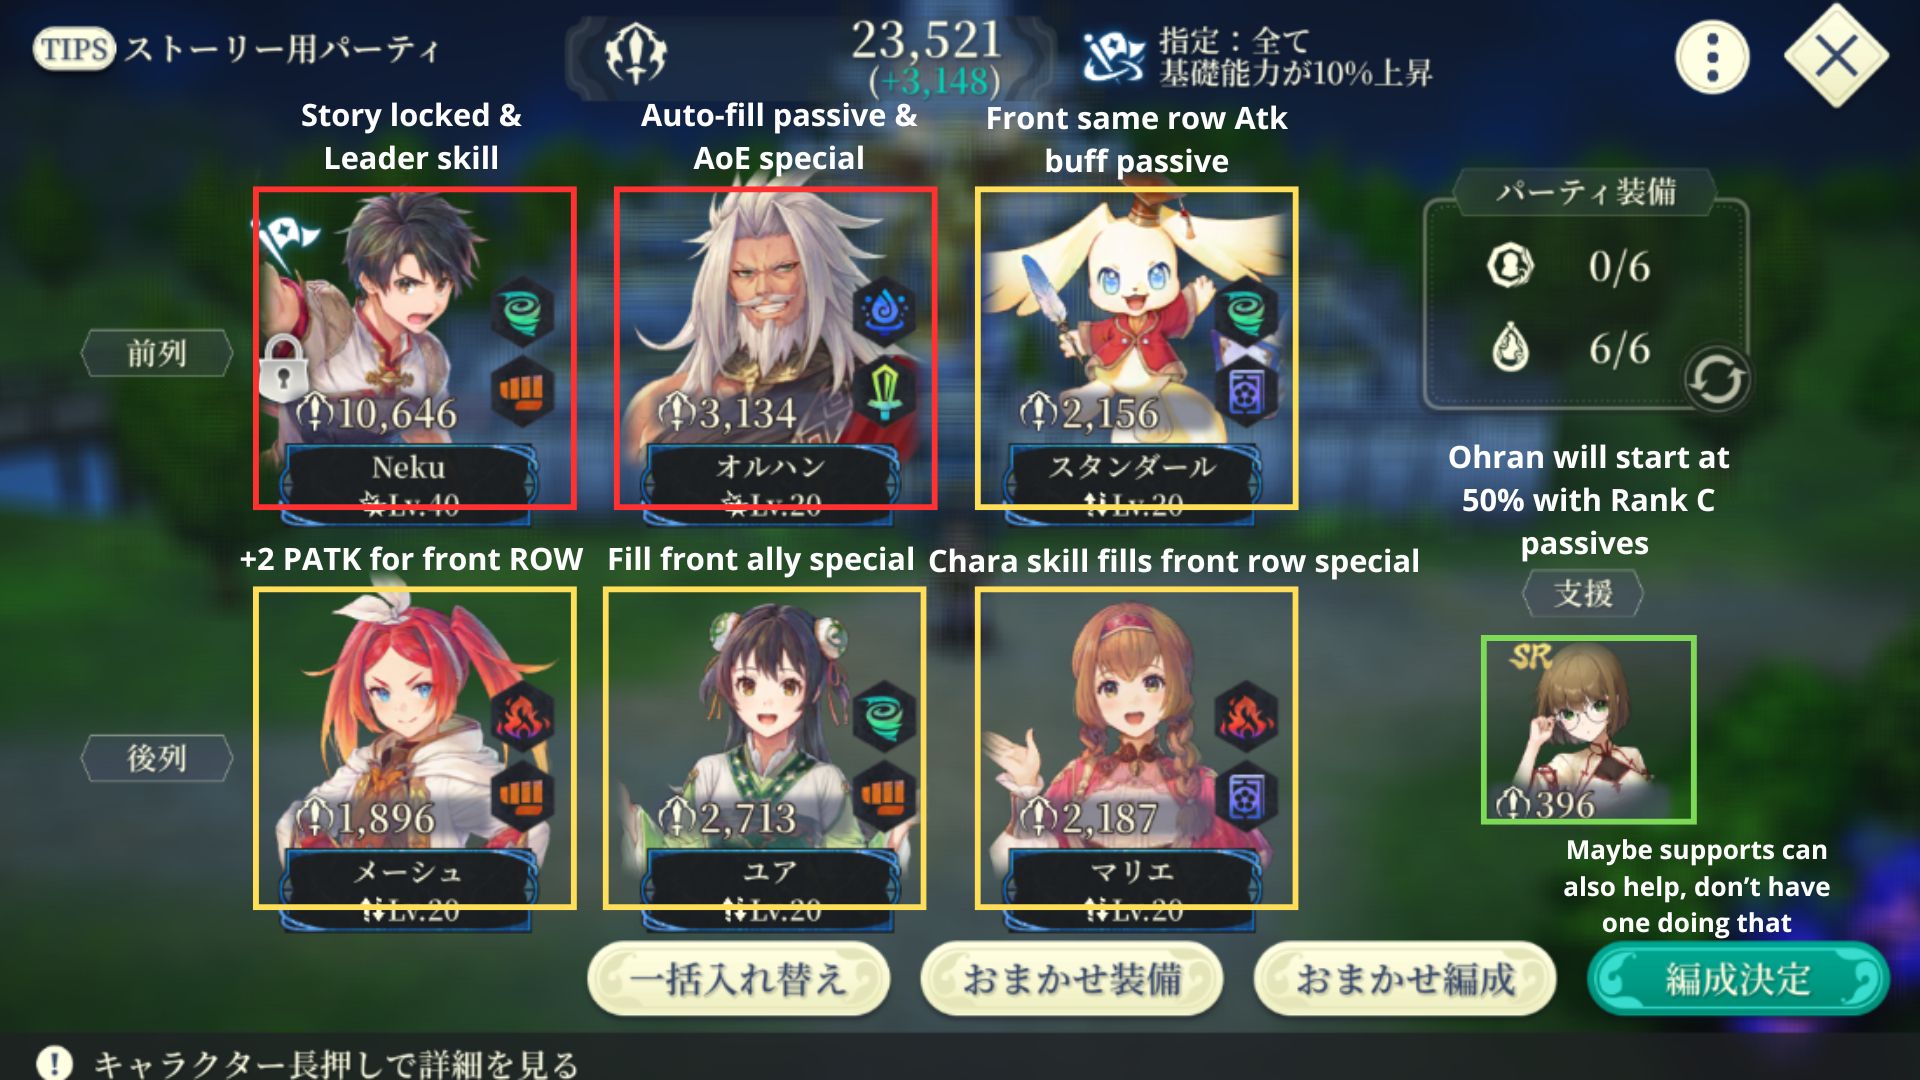
Here is a party built entirely from free characters to speedrun low-level content, chosen to show how much positioning alone contributes.
The front row runs
 Hero
,
Hero
,
 Orhan
, and
Orhan
, and
 Stendhal
. The Hero brings the leader skill, Orhan supplies the area special that clears the fight, and Stendhal sits there to buff the attack of the ally in front of them.
Stendhal
. The Hero brings the leader skill, Orhan supplies the area special that clears the fight, and Stendhal sits there to buff the attack of the ally in front of them.
The back row runs
 Meesh
,
Meesh
,
 Yua
, and
Yua
, and
 Mariye
, each lined up behind the front-row character they feed. Meesh adds two stages of physical attack to the row in front, Yua fills the special gauge of the ally in front of her, and Mariye’s Unique Skill fills the front row’s special gauge.
Mariye
, each lined up behind the front-row character they feed. Meesh adds two stages of physical attack to the row in front, Yua fills the special gauge of the ally in front of her, and Mariye’s Unique Skill fills the front row’s special gauge.
The result is that Orhan opens the battle with her gauge already at 50% from rank C passives alone, buffed by the two characters positioned to feed her, and the fight ends before the enemy has done anything interesting. Better characters obviously do this faster, and the point is that the arrangement is doing most of the work.
Aiming a Unite Attack
One small habit worth building immediately: hold the unite button instead of tapping it. Tapping lets the game pick your targets for you, and holding opens the action so you choose them yourself. In a fight where one enemy needs to be broken before the others get a turn, that difference decides the battle.
Related Suikoden STAR LEAP Resources

Guide
Gear, Accessories and Runes: What to Farm
Equipment ranks and slots, elemental gear sets from EX bounties, why disguises cost more than they give, which accessory each role wants, and the runes worth 99,999 Potch in Suikoden STAR LEAP.

Guide
Character Growth: Cooking, Training and Stars
How bond levels, the Talent Tree, offline EXP, shard training, and the Tablet of Promise combine to raise characters in Suikoden STAR LEAP.

Guide
Combat and Team Building: Elements and Formation
How damage, resistances, breaking, and turn order work in Suikoden STAR LEAP, and how to build a party that beats the fight in front of you.
News
Suikoden STAR LEAP: New Event RPG and a Free SSR Nanami
A four-episode Event RPG opens September 30 with up to 24,000 Fantasy Stones and two new SSRs, alongside a login bonus for Suikoden: The Anime's Nanami.

News
Suikoden STAR LEAP: Chapter 3 Story and a QoL Overhaul
New Chapter 3 story, the Emotions & Secrets banner with Rachana, Gremio and Hou, badges, and a September 21 update with bulk trading and eight party slots.